What 3 Years Taught Me About Sit-Stand Desks & Cable Management (2026)
Tired of desk clutter and inefficient home office setups? Learn my tried-and-true framework for sit-stand desks with seamless cable management. Optimize your workflow now.
Introduction: The Quest for an Automated, Clutter-Free Home Office
Three years ago, as an Operations Lead transitioning to full-time remote work, my primary directive was clear: replicate and, if possible, surpass the efficiency of my corporate setup within the confines of my home office. I was obsessed with minimizing friction and maximizing output. My desk, however, quickly became a tangible representation of operational inefficiency. Manual height adjustments felt like a productivity drain. The ever-present spaghetti of cables under and around my workspace was more than just an aesthetic annoyance; it was a constant source of cognitive load, a visual reminder of an unoptimized system. I needed a sit-stand desk for my home office with cable management that wasn't just functional, but truly automated and invisible, allowing me to focus on strategic tasks, not tangled wires.
The Context: My Workflow & The Problem I Was Trying To Solve
>>What does a typical remote workday look like for me? It's a dynamic blend of activities. Mornings often involve deep work sessions – coding, data analysis, or strategic planning – requiring intense focus and minimal distraction. Afternoons shift to a flurry of <video calls, team stand-ups, and collaborative whiteboarding sessions. I operate with a multi-monitor setup (a 34-inch ultrawide and a 27-inch vertical display), a high-quality webcam, a professional microphone, and various peripherals. This isn't a static environment; I fluidly move between sitting for focused tasks and standing to energize during calls or break up long periods of concentration. The operational inefficiencies were glaring: every height adjustment risked snagging a cable, the visual noise of wires created a persistent low-level distraction, and the physical toll of a static posture, even for short periods, was undeniable. My goal was to 'automate' my physical workspace for peak performance, much like I meticulously automate digital workflows and processes for my team. The desk needed to be an enabler, not a bottleneck.<

What I Tried First (and Why It Failed Spectacularly)
My initial forays into optimizing my workspace were, in hindsight, a masterclass in trial-and-error, leaning heavily towards error. I was convinced I could piece together a solution on a budget, an operational efficiency mindset gone slightly awry.
- The "Budget" Electric Sit-Stand Frame with My Old IKEA Top: My first move was to purchase a highly-rated, affordable electric sit-stand desk frame (around $250 in 2021) and bolt it to my existing IKEA LINNMON tabletop. The frame itself was decent, but the lightweight particle board top bowed noticeably under the weight of my monitors and monitor arm. The biggest issue, however, was cable management. This frame offered absolutely zero integrated solutions. I tried adhesive cable clips – they peeled off with alarming regularity, especially when the desk moved. I then invested in a generic under-desk cable tray, a flimsy wire mesh affair. It was a nightmare. Cables would spill out, the tray itself would sag, and every time the desk moved, the entire setup looked like a bird's nest being actively disturbed. It was visually chaotic and functionally unreliable.
- The "Smart" Cable Sleeves & Zip Ties Experiment:> Frustrated with the tray, I went for a more aggressive, organized approach. I bought a bulk pack of neoprene cable sleeves and hundreds of zip ties. My plan was to bundle everything tightly. While this looked clean initially, it created new problems. Any minor change to my setup – adding a new peripheral, swapping a monitor – became a 20-minute untangling and re-zipping ordeal. The sleeves, while neat, trapped heat, and the rigidity they imposed on the cables put strain on ports. This wasn't automation; it was a manual, high-maintenance system. Honestly, I'd skip this if you value your time.<
- The Desk with a Single Grommet Hole:> My next attempt was an upgrade to a slightly better> desk, one that advertised "built-in cable management" with a single, lonely grommet hole. I thought, naively, that this would be enough. It wasn't. All my monitor cables, power cables, and peripheral wires had to funnel through one small opening, creating a massive bulge of cables directly under the desk. While <<some cables were out of sight, the primary issue of congestion and potential snagging during desk movement remained. It was a partial solution that created a new bottleneck.
Each iteration, while well-intentioned, added complexity, increased maintenance effort, or failed to address the core problem of seamless cable management during dynamic desk adjustments. My initial attempts were focused on patching symptoms rather than designing an integrated solution, a critical oversight for any operations professional.
What Actually Worked: The Key Insights That Changed Everything
After nearly a year of iterative failures, a few critical insights emerged that fundamentally reshaped my approach to my home office setup. It wasn't about adding more cable ties; it was about systemic design.

- Integration is Non-Negotiable: The biggest revelation was that effective cable management for a sit-stand desk can't be an afterthought; it must be designed into the desk itself. Aftermarket solutions, while sometimes helpful for minor tweaks, consistently fell short for a complex, dynamic setup like mine. I needed channels, trays, and grommets that moved *with* the desk and were sturdy enough to handle the constant motion.
- Power Management at the Source: I realized a significant portion of my cable clutter was simply power bricks and outlets. Moving the power strip directly onto the underside of the desk, secured with heavy-duty Velcro or screws, was a game-changer. This meant only one power cable needed to run down to the wall outlet, drastically reducing the "waterfall" of wires. This small operational shift had a massive impact on tidiness and safety.
- The "Zero Drop" Principle: My new mantra became "zero drop." All cables, from the monitors to the keyboard, needed enough slack to accommodate the full range of the desk's motion (from sitting at 28 inches to standing at 48 inches) without ever touching the floor or becoming taut. This required careful measurement and routing. Any cable that touched the floor was a potential snag risk and a visual blight.
- Strategic Grommet Placement and Size:> A single grommet is insufficient. I found that at least two, preferably three, strategically placed grommets (one for power, two for data/peripherals) were essential. These needed to be large enough to accommodate multiple cables without jamming. Desks that offered integrated cable channels leading to these grommets were superior.<
- Vertical Cable Management is Key: While under-desk management is crucial, the vertical run from the desk to the floor still needed attention. A simple, flexible cable spine or a sturdy cable management sleeve (the heavy-duty, zippered kind, not the flimsy neoprene) that attaches to the desk frame and moves with it, proved far more effective than trying to bundle loose wires.
These insights weren't just about aesthetics; they were about operational resilience and reducing failure points. A clean, well-managed desk meant fewer interruptions, less time spent troubleshooting, and ultimately, greater focus on my work.
The Framework I Use Now: Building an Automated Home Office Ecosystem
My current approach isn't just a collection of tips; it's a systematic framework for building a high-performance, automated home office ecosystem. For any Operations Lead, this means designing for reliability, scalability, and minimal maintenance.
Phase 1: Foundation - The Right Sit-Stand Desk
- Integrated Cable Management First: This is non-negotiable. Look for desks with built-in, sturdy cable trays or channels that run the full width of the desk. These should be easily accessible for initial setup but securely enclosed once complete.
- Multiple, Well-Placed Grommets: Seek out desks with at least two, ideally three, grommet holes (or cutouts if you're handy) – one for power, one for monitor/data, and one for peripherals. Their placement should be intuitive, typically towards the back edge.
- Sturdy, Stable Base: The desk frame must be rock-solid, even at its highest extension. Wobble introduces micro-distractions and can stress cable connections. Look for dual-motor systems and heavy-duty steel construction.
- Programmable Memory Presets: For true automation, memory presets are essential. My desk has four, allowing me to instantly switch between my preferred sitting height, standing height, and even a "lean" height for quick checks.
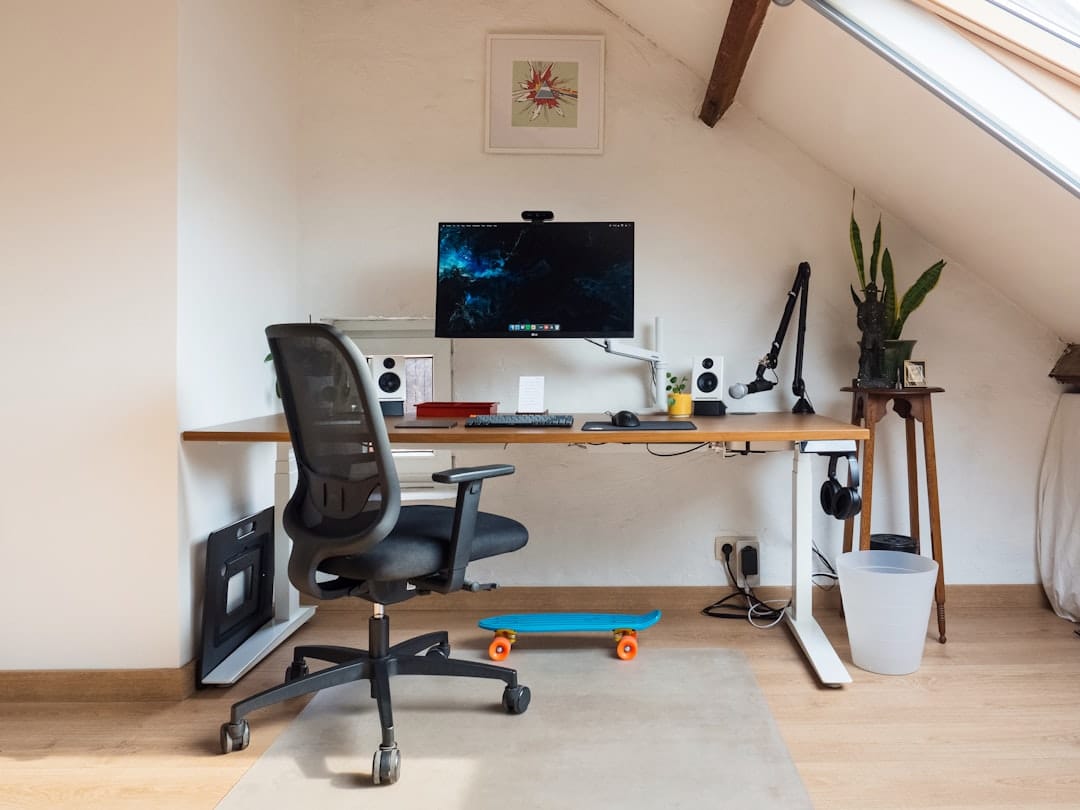
My current desk, the UPLIFT Desk V2 Commercial (80x30 inch solid wood top), has been a revelation. It features an integrated wire management tray that runs the full length, along with three grommet holes. The stability, even with heavy monitors, is exceptional.
Amazon — Find the best deals on Amazon
Phase 2: Power & Connectivity Hub
- Under-Desk Power Strip: Attach a high-quality, surge-protected power strip directly to the underside of the desk. I use an Anker Power Strip with USB-C, secured with heavy-duty mounting tape and screws. This minimizes the number of cables running to the wall.
- USB Hub / Docking Station: Centralize all peripheral connections (keyboard, mouse, webcam, microphone) to a single USB hub or docking station, which then connects to your primary computer with a single cable. I run a Caldigit TS4 Thunderbolt Dock, which handles power delivery, multiple monitors, and all peripherals. This dramatically reduces cable spaghetti.
- Short Cables: Invest in cables of the appropriate length. Long, coiled cables are a breeding ground for clutter. Measure precisely from port to port, allowing for desk movement, and then buy cables that are just right.
Phase 3: Vertical Management & Aesthetics
- Flexible Cable Spine: For the vertical run from the desk's integrated tray to the floor outlet, a flexible cable spine is paramount. It bundles all cables neatly and moves seamlessly with the desk. My current setup uses an Ergotron Cable Management Spine.
- Monitor Arm with Cable Channels: My dual monitor arm (Ergotron LX Dual Stacking) has integrated cable channels. This keeps monitor cables completely hidden from the desk surface, running down the arm and into the desk's grommets.
- Adhesive Cable Clips (Strategic Use): Use adhesive clips sparingly, only for short runs or to secure a single cable along the desk leg, ensuring they don't impede desk movement.
"The goal isn't just a clean desk; it's a resilient system. Every cable out of sight is a potential point of failure eliminated from your cognitive load. This is operational excellence applied to your personal workspace."
- My internal mantra
This systematic approach, focusing on integrated solutions and centralized power/connectivity, has transformed my home office into a truly automated, high-performance workspace. I spend zero time thinking about cables now, and all my focus goes where it belongs: on strategic operations.
Comparison Table: Integrated vs. Aftermarket Cable Management Solutions
For operations managers, the choice between integrated and aftermarket cable management is a cost-benefit analysis concerning setup effort, ongoing maintenance, and long-term reliability. Here’s a breakdown:
| Feature | Integrated Cable Management (e.g., UPLIFT Desk) | Aftermarket Cable Management (e.g., Generic Trays, Sleeves) |
|---|---|---|
| Setup Time | Low (cables route into pre-designed channels/trays) | Medium to High (requires planning, attachment, and modification) |
| Ongoing Maintenance | Very Low (secure, designed for movement; "set it and forget it") | Medium to High (clips detach, trays sag, sleeves need re-zipping for changes) |
| Aesthetic Impact | Excellent (seamless, cables disappear) | Varies (can look clean if done perfectly, often looks "added on") |
| Cost-Effectiveness (Long-term) | High (initial desk cost higher, but saves time/frustration, increases longevity) | Low to Medium (cheaper initial outlay, but recurring costs in time/replacement parts) |
| 'Failure Rate' (Cables Snagging/Tangling) | Extremely Low (designed to move with the desk) | Medium to High (prone to snags, especially during desk movement) |
| Robustness | High (often metal trays, heavy-duty grommets) | Varies (many plastic/mesh solutions are flimsy) |
| Scalability/Flexibility | >Good (usually ample space for future additions)< | Limited (can become overcrowded quickly) |
From an operational standpoint, the initial investment in a desk with integrated cable management pays dividends in reduced downtime, increased focus, and a significantly lower "failure rate" for your physical workspace. It's about proactive design, not reactive fixes.
>What I'd Do Differently Starting Over: Lessons for Other Ops Leads<
If I were to set up a new home office today, armed with three years of hard-won experience, here’s precisely what I’d prioritize and how I’d advise any Operations Lead approaching this challenge:
- Budget for Quality Upfront: My biggest mistake was trying to "save" money on the desk and cable management initially. This led to multiple purchases, endless frustration, and ultimately, a more expensive and less effective solution. I would immediately invest in a premium sit-stand desk with sturdy, integrated cable management. Think of it as investing in a critical piece of infrastructure.
- Prioritize the Desktop Material: Forget particle board. A solid wood or high-quality laminate desktop is essential for stability and longevity, especially with multiple monitors and monitor arms. It prevents bowing and provides a secure anchor for under-desk accessories.
- Map Out Your Power Needs: Before buying anything, I'd draw a diagram of every device, its power requirements, and its cable length. This informs the placement of your under-desk power strip and helps you buy the correct short cables from day one.
- Go Wireless Where Possible (Strategically): While I advocate for wired connections for reliability, certain peripherals (mouse, keyboard if you prefer) can significantly reduce cable clutter. I've moved to a high-performance wireless mouse and keyboard, but my webcam and microphone remain wired for zero latency and power reliability during long calls.
- Over-Communicate with Your Employer (If Applicable): If your company offers a remote work stipend, make a strong business case for why a high-quality, integrated sit-stand desk with comprehensive cable management is an investment in your productivity, well-being, and long-term output. Frame it in terms of ROI.
- Don't Underestimate the Monitor Arm: A good monitor arm is a game-changer. It frees up desk space, allows for ergonomic adjustments, and most importantly, provides another layer of integrated cable management. It’s not just about ergonomics; it’s about decluttering.
My advice is to approach your home office setup with the same rigor you'd apply to optimizing a critical business process. Design for resilience, minimize failure points, and invest in tools that automate tedious tasks, allowing your focus to remain on high-value activities.
FAQ: Your Home Office Automation Questions Answered
How much space do I really need for effective cable management on a sit-stand desk?
You need enough depth for a sturdy, integrated cable tray (typically 4-6 inches deep) and enough width to accommodate all your power bricks and cable bundles. For the vertical run, ensure you have a clear path for a cable spine. My 80x30 inch desk offers ample space, but a 60x30 inch can also work if the integrated solutions are well-designed. The key is to have dedicated, enclosed space.
Are adhesive cable clips ever useful, or should I avoid them entirely?
They have limited, strategic utility. I use them for very short runs, like securing a single USB cable along the underside of a monitor arm or to guide a cable along a desk leg that doesn't move. For anything that needs to move with the desk or carry significant weight, they are unreliable and will fail. Think of them as finishing touches, not primary management solutions.
What's the single most impactful change I can make for cable management?
Hands down, it's getting a sit-stand desk with truly integrated, sturdy cable management. This means a desk that has a full-width, enclosed tray and multiple grommet holes. All other solutions are secondary and only truly effective when built upon this foundation. Without it, you're constantly fighting against the desk's design.
Is it worth the extra cost for a desk with integrated cable management?
Absolutely. From an operational perspective, the "extra cost" is an investment in reduced setup time, minimized ongoing maintenance, superior aesthetics (which reduces cognitive load), and significantly improved reliability. It prevents snags, reduces the risk of damaged cables, and ensures your focus remains on work, not wires. Consider it a preventative measure against productivity loss.
How do I manage cables for peripherals that I frequently plug and unplug (e.g., laptop charger, external hard drive)?
This is where a high-quality docking station (like a Thunderbolt or USB-C hub) becomes invaluable. All your semi-permanent peripherals connect to the dock, and then a single, easily accessible cable runs from the dock to your laptop. For occasional items, I use a small magnetic cable clip attached to the edge of my desk, which holds the cable end ready for quick connection without letting it fall to the floor. This minimizes disruption to the overall clean setup.
Can I convert my existing sit-stand desk to have better cable management?
It depends heavily on your existing desk. If it's a solid top, you might be able to add aftermarket under-desk trays and drill your own grommet holes (use a hole saw, measure carefully!). However, integrating a full-width, enclosed solution that truly moves seamlessly with the desk is difficult to replicate with aftermarket parts. You can significantly improve it, but achieving the "integrated" feel is challenging. For a comprehensive guide on optimizing your workspace for maximum efficiency, check out our pillar page on home office automation.
FlexiSpot — See FlexiSpot standing desks
Conclusion: Automate Your Workspace, Boost Your Output
My three years navigating remote work, specifically optimizing my sit-stand desk for my home office with cable management, have distilled into a single, undeniable truth for any Operations Lead: your physical workspace is an extension of your operational processes. If it’s cluttered, inefficient, or prone to failure, so too will be aspects of your focus and output. The journey from tangled wires and manual adjustments to an automated, clutter-free desk wasn't just about aesthetics; it was about designing a resilient system that supports peak performance.
Embrace a "systems thinking" approach. Invest in integrated solutions that minimize friction, centralize power, and anticipate movement. A well-managed sit-stand desk isn't merely furniture; it's a strategic investment in your personal productivity, your sustained focus, and your long-term well-being. Stop managing individual cables and start designing an automated workspace ecosystem. The dividends in saved time, reduced cognitive load, and enhanced output are substantial. Take control of your workspace; let it empower your work, not detract from it.
Amazon Associates — See latest price on Amazon
Related Articles
- Best Ai-Powered Video Editing Software For Mac
- SAP's Future: How AI Reinvention Empowers Process Owners (2026 Guide)
- SAP Joule vs ChatGPT vs Claude: Best for SAP Automation? (2026)
- Nutmeg vs Scaled & Icy: Better for European Ops Leads? (2026)
- 5 Essential AI Models: ChatGPT vs. Claude for SAP Enterprise Teams (2026)
- GitHub Copilot vs Tabnine: Better AI Coding Assistant? (2026)